 à developpez.com")


I. Introduction▲
WARNING
This is the english translation of the french article I made.
My native language is french. I have some basic knowledge of english language, thus I translated the tutorial by myself and sometimes by the use of a famous translation service, so I hope the whole text is easily understandable.
Whatever, the french version prevails.
In case of misunderstanding, do not hesitate to contact me at OpenERP Official Forum
Thank you for reading
Point Of Sale module (POS OpenERP) is a basic one . That is to say, it can sell products and that's all.
However, when used in a company as the main software, it turns out to be too short in this form, and request certain changes . This is also where we can truly realize the flexibility of OpenERP and quality of ORM . In fact , I think ,for me, it's a great program because it allows precisely to do everything you want on a very well organized and very well thought out basis . It is my opinion, but it is shared by many people in the OpenERP community.
As all software/firmware, it is not flawless , but they can be corrected fairly quickly, and you can expand its capabilities or functions at infinity.
In this case, in the event that kept me busy for quite some time , we wanted the sellers to connect with only one account, they can access customer files to modify or create new ones and that they may also have a view of the history of their purchases. We also wanted to sell "on demand" packages and apply various discounts . Also we have imagined being able to communicate with all shops by sending a simple message that would be displayed directly in the point of sale.
Here then, after many hours of research and development , a module that adds these features to the point of sale, tg_pos_enhanced Module
My knowledge of OpenERP is still limited, it is likely that I have not used the ORM or JQuery maximum. However, in this article you may understand certain concepts or functions of the system and it should guide you in developing your own modules.
However, if you find any defect or error, or if you want to clarify something, do not hesitate to discuss on the forum.

To recap, the point of sale is the main application used by vendors, we wanted all of these functions are accessible directly from the POS itself, that is to say without having to disconnect to open another application.
II. Warning▲
tg_pos_enhanced module matches certain needs and it is possible that your company does not have the same, which is why you might find this or that useless function in your case, but then you are free to modify the module to adapt it for your needs.
You will have in all cases, an additional basis on which to rely, especially as I'll explain the operation of the module and some important functions.
Due to the design of tg_pos_enhanced module, the POS will no longer work in « Off-line » mode, because as the module makes calls to the OpenERP database , it requires a quasi-permanent connection therewith.
This is the choice that I made because in the current operating point of sale, all the data is loaded at the opening of the session. This can be playable if you have few products, but tg_pos_enhanced module allowing, among other things, select, edit or create customers, it is best not to load all at the opening of the POS, especially if you have tens of thousands. On the other hand, the module can also display sales history, it was not thinkable to load all the data in the browser (LocalStorage).
III. Module Overview▲
For practical reasons, the module has been divided into four modules:
- le module tg_partner_firstname : a very simple module, it adds a « firstname » field to customers;
- le module tg_pos_packs : this is the Custom Pack module ;
- le module tg_pos_message : this is the internal POS messaging module;
- le module tg_pos_enhanced : this is main module.
III-A. tg_partner_firstname module▲
Few lines of Python and a few lines of XML suffice for this module simply adds a firstname field in res_partner model.
Names are formatted in uppercase and firstname are capitalized.
III-B. tg_pos_packs module▲
This module allows to create packages from existing products.
Pack created becomes a « service », it will not generate stock movement, it can contain multiple items (as many as you want), each item can contain several products (as many as you want).
When selling, we choose a product item, and we can also choose the variant of the product (color, size, etc.).
This is the package price that will be displayed in the order, the products in turn have their prices reduced to 0.00 euro and they generate stock movements.
III-C. tg_pos_message module▲
It allows to create and schedule HTML messages that will be displayed in the selected POS during a specified period.
This is useful in the case of a company with several stores in order to quickly communicate with them.
III-D. tg_pos_enhanced module▲
It incorporates all the functions and uses of previous modules.
tg_pos_enhanced module provides the following features and changes:
- « cashiers » function : it can make sales using the « manager » account from the point of sale without having to disconnect/reconnect each time a seller makes a sale;
- customer management functions: they allow you to select, edit, or add customers without leaving the point of sale;
- purchases history : After selecting a customer, you can view purchases he made. This will, for example, to verify that the customer has indeed purchased the product that brings in case of malfunction (after sales service);
- POS receipt : It provides details of products, taxes and discounts as well as the cumulative;
- « Custom Packs » : These are packs of products. You can choose the products that make up the pack as well as product variants if any;
- special discount : as account « manager » is used by everyone, we need global discounts applied is controlled by the store manager. This function allows him to apply a special discount to a customer. To do this, he must enter a password for this purpose, and must specify the reason for the discount;
- Internal messaging : messages are displayed in the point of sale. They can be programmed to appear only once or every X hours;
- return of product : this function allows to return a product generating a stock movement. In this present case, a negative amount can not succeed, because we wanted a returned product is subject to a minimum of an exchange;
IV. tg_partner_firstname detail▲
This module allows you to simply add the « firstname » field (firstname) to customers (res.partner)
Indeed, OpenERP has not provided this field and the problem is that when using the search box to find a customer by entering three or four letters of a name, the returned results will not always correspond to your expectations.
For example, if you want the "Richet" customer by entering « ric » in the field to refine your search, OpenERP may return this:
- richard alain ;
- mathurot eric ;
- stephan brice ;
- richet alain.
Although this function can sometimes be useful, it is not when it comes to finding people by name. This is when the « firstname » field occurs. You'll have to set correctly « name » and « firstname » fields, but once in the point of sale, when you use the search field, the search will then only on the "name" field.
To see the effects of this module, go to the « Sale » module (sale) and click on the « Partners » menu (customers) and click the « Edit » button. The following form appears:

As previously stated, the full names are formatted. We detected that sellers entering names / firstnames anyhow (uppercase, lowercase), so we apply the following rule: all names in uppercase firstnames capitalized.
Development level, it does not require much time, as shown in the following class:
It simply adds a field then create() and write() functions are overriden to take into account the formatting of names/firstnames.
class inherit_res_partner(osv.osv):
    _name='res.partner'
    _inherit='res.partner'

    def write(self, cr, uid, ids, vals, context=None):
        v_name = None
        v_firstname = None

        if vals.get('name'):
            # name to Uppercase
            v_name = vals['name'].strip()
            vals['name'] = v_name.upper()

        if vals.get('firstname'):
            # firstname capitalized
            v_firstname = vals['firstname'].strip()
            vals['firstname'] = v_firstname.title()

        result = super(inherit_res_partner,self).write(cr, uid, ids, vals, context=context)
        return result

    def create(self, cr, uid, vals, context=None):
        v_name = None
        v_firstname = None

        if vals.get('name'):
            # name to Uppercase
            v_name = vals['name'].strip()
            vals['name'] = v_name.upper()

        if vals.get('firstname'):
            # firstname capitalized
            v_firstname = vals['firstname'].strip()
            vals['firstname'] = v_firstname.title()

        result = super(inherit_res_partner,self).create(cr, uid, vals, context=context)
        return result

    _columns = {
        'firstname' : fields.char('Firstname', size=128),
        }
Above is the illustration of overriding the native functions of the ORM. Here, our write() and create() functions will be executed before calling the functions of the ORM with the super() function
See ORM functions in Memento Technique
About the view, a simple overload of the original view to add the field:
<!-- Vue formulaire -->
<record model="ir.ui.view" id="view_tg_partner_form">
    <field name="model">res.partner</field>
    <field name="name">view.tg.partner.form</field>
    <field name="view_type">form</field>
    <field name="inherit_id" ref="base.view_partner_form"/>
    <field name="arch" type="xml">
        <field name="name" position="after">
            <h5 class="oe_edit_only">
                <label for="firstname"/>
            </h5>
            <h2>
                <field name="firstname"/>
            </h2>
        </field>
    </field>
</record>
The field is placed just after the « name » field .
As you can see in tg_partner_view.xml I also overloaded « tree » and « kanban » views.
V. tg_pos_packs detail▲
tg_pos_packs module depends on product_variant_multi module developed by Akretion. You will also find in the zip file under "Download"
Exist in OpenERP module for creating BOM. But these bills are frozen, they do not allow you to select « on demand » products that compose them.
That is why I imagined a kind of Custom Pack.
Custom Pack can conatin as many products as you want. During the sale, simply select among products.
Obviously, you'll have to build the pack with products having substantially the same price.
V-A. Build a Custom Pack▲
First and foremost, you must have inserted items in the « Sale » module (sale).
To create a package, proceed as to create a normal product. Warning, do not use the « Product template » menu of product_variant_multi module, it allows to create product models with variations, then generate products.

As you see in the picture above, when you select the « Custom Pack » box, the type of the product becomes a « service », it is not editable, and the tab « Pack » appears.
Click « Pack » tab.

Click on the « Add an item » link to add products. Here, in fact you add models (Product template). Do not worry, the templates are created automatically.
Products are grouped by numbered groups.
That you understand the principle of operation, here's how the package will appear in the point of sale:

You have noticed that in the pack, two elements were in the « 2 » group (yellow).
Each group of items will be displayed in the « Item » drop down list. If several products are in the same group, then they appear in the same list (item). So you can choose among the products from the list and propose several combinations to your customers.
Here, the customer will have the choice between « Ride Cymbal Meinl Byzance 20 » and « Zildjian K Custom Ride 20 » pack.
To group products together, simply change the number in the « Group number » field of the form.
To make it more readable, I made sure that the groups appear in different colors.
Similarly, a product can have several variants as in the image below:

Product variants appear in the list on the right. If a product has no variant, there will be no choice, the list will be the name of the product.
If a product has several variants, then simply select the desired variant by the customer. Here , the variant is a color.
The pack will contain a « Sonor Essential Floor Tom 16x16 » and the customer can choose the color:
- Piano Black ;
- Dark Forest ;
- Maple 46 ;
- Blue fade ;
- Brown fade ;
- Green fade.
Obviously, these products already exist in the point of sale, they can also be sold individually.
All combinations are available to you.
If you sell car parts and you want in your package the customer can buy two batteries + a wheel, you will then need 3 groups.
You can quite offer the same group twice.
For example, you offer several batteries of different brands and different colors. You can make a first group:
- Batterie Fulmen 12V (rouge, vert, bleu) ;
- Batterie Varta 12V (grise, rouge) ;
- Batterie Feu Vert 12V (noire) : pas de variante.
Then create the second group identical and your customer will go with a red Fulmen and Black Green Fire if desired.
Add in your pack, the train wheels in the « 3 » group and the deal is done.
You can put as many items as you want in a Custom Pack.
At installation, the module creates a category of « Custom Packs » in the point of sale. The packs are automatically placed in this category when you create them.
VI. tg_pos_message detail▲
This module allows you to create messages that appear in the point of sale.
Here is a concrete use case:
A customer uses a product you sold, it hurts, poisons, or whatnot ... in short, the product should be withdrawn from sale urgently.
Then you just create a new message and schedule it appears every hour for the next 3 days.
Another case in point: sales of product X are down, encourage sellers to highlight by displaying a message every morning for a week.
Or just send encouragement to your sales teams or wish them the new year!
The module menu appears only for the administrator (base.group_no_one) in the Point Of Sale /Tools menu.

You can set a start date and an end date, choose to display the message only once or to display every X hours.
You can select points of sale recipients of the message.
An icon will be displayed on the message according to the message type, like dialog boxes in software.
The message can be in HTML format. You can put images (hosted) taking into account the average screen size of your stores. Do not post an image of size greater than the smaller screen resolutions.
Messages are retrieved to the logon point of sale, and whenever you create a new order.

Requires that the user clicks on the button with the X in the upper right corner to close the message and continue sales.
At this time, the playback date is stored in the database (datetime), it will then be used when retrieving new messages according to the time interval that you set if this is the case.
VII. tg_pos_enhanced detail▲
This is the biggest piece.
Here discussed overloading the original module (point_of_sale) so that in case of updating OpenERP changes are not overwritten
Here is the point of sale revisited. All modules previously reported find their use here.
VII-A. The left panel (#leftpane)▲
To start, here is the modified left side panel(#leftpane)

Includes (1) the cashiers moduleOpenERP Tutorial: Module creation and modification of the Point Of Sale , who this time is integrated into the tg_pos_enhanced module itself.
Above the cart (2), the selected customer panel with search and creation buttons for customers.
VII-A-1. About cashiers module▲
A small change was made.
In case you have created more than one cashier, each new command resets cashiers list and you must select your cashier name again in the list .

This is to ensure that all vendors do not use the same cashier.

The portion of code that allows this :
if(nbCashiers > 1){
    var new_option = '<option value="nobody"></option>\n';
    self.$('#cashier-select').html(content + new_option);
}
If more than one cashier is detected, we add an empty element to the list of the cashiers. It will be selected automatically for each new order as shown in the code below.
if(nbCashiers > 1){
    $('#cashier-select').val('nobody');
    globalCashier = 'nobody';
    cashier_change(globalCashier);
}
VII-B. Find a customer▲

To find a customer, just click on the icon in the left panel.
You can search for a customer by the first letter of its name or by using the search form.
VII-B-1. Search by letter▲
Click on a letter to view the customers whose name starts with that letter.

The left panel (1) is grayed out. Click on a letter (2), customers will be displayed in the table (3). When you select a customer, the panel automatically closes, the left panel is no longer grayed out and Products reappear.
You can refresh the table at any times (4), Close the panel or see the number of customers in the table.
VII-B-2. Search with the form▲

Enter the first letters of the name and then press « Enter » on your keyboard or click on the magnifying glass button.
The search function has been changed.
In OpenERP the search field using the SQL keyword « ilike »but it is actually translated like this « ilike '% word%' ».
Putting the % sign before and after the search word, lets find the object names where the search word appears anywhere. This could be handy at times, but in this case it did not help us too much.
By adding the = sign before ilike, we get the expression « ilike 'word%' ». This is the effect we wanted.
To search the database, I use the following function:
// get data from DB
var fetch = function(model, fields, domain, ctx){
    return new instance.web.Model(model).query(fields).filter(domain).context(ctx).all();
};
Here we see the « filter(domain) » attribute.
Suffice it to write a proper filter to get customers by the first letter of their name or by the words entered in the search form.
 var l_filter = [['customer', '=', true],
                 ['name','=ilike', letter + '%']];

if(letter == '0-9'){
    l_filter = [['customer', '=', true],
                 '|', '|', '|', '|', '|', '|', '|', '|', '|',
                ['name','=ilike', '0%'],
                ['name','=ilike', '1%'],
                ['name','=ilike', '2%'],
                ['name','=ilike', '3%'],
                ['name','=ilike', '4%'],
                ['name','=ilike', '5%'],
                ['name','=ilike', '6%'],
                ['name','=ilike', '7%'],
                ['name','=ilike', '8%'],
                ['name','=ilike', '9%']
               ];
}
In case you would click on the button « 0-9 » to search for a customer whose name begins with a digit , the l_filter filter is then redefined to retrieve all customers whose names begin with any digit.
The « letter » variable here is the letter that was clicked, or the word entered in the search field using this function:
this.$('#input_search').keypress(function(e) {
    if(e.which == 13) {
        var l = $(this).val().trim();

        if(l != ''){
            $('#input_search').val(l);
            self.get_clients(l);
        }
    }
});
VII-C. A selected customer▲
When a customer is selected, it appears above the cart as shown in the image below.

Here the customer has accumulated 1040.00 euros purchase in our shops. This is a « VIP »
VII-C-1. Edit or create a customer▲
You can change the customer information by clicking on the icon with a pencil or create a new customer by clicking on the icon with the + sign.
The following form appears:

When you submit the form, the information is sent directly to the database and the customer is automatically selected for the current order.
To write to the database from JavaScript, you can use the following function:
var Partners = new instance.web.Model('res.partner');

Partners.call('write_partner_from_pos', [cid, cname, cfirstname, czip, cphone, cmobile, cemail, ccomment],undefined,{ shadow:true })
.fail(function(clientId){
    alert('Error : customer has not been created nor updated');
})
.done(function(clientId){

    var sel_client = cname.toUpperCase() + ' ' + cfirstname;
    $('#selected-customer-name').html(ellipseName(sel_client));
    $('#input_partner_id').val(clientId);

    global_letter = sel_client[0];

    self.get_clients(global_letter);
    self.pos.get('selectedOrder').set_partner_id(clientId);
    self.select_client(clientId, cname.toUpperCase(), cfirstname, c_montant_cumule);

    self.hide_form_client();
});
I will not go into too much detail, but the call() function above is applied to the write_partner_from_pos() function found in the Python file:
# créer / modifier un client depuis le POS
def write_partner_from_pos(self, cr, uid, cid, cname, cfirstname, czip, cphone, cmobile, cemail, ccomment, context=None):
    if context is None:
        context = {}
    name = cname.upper()
    firstname = cfirstname.capitalize()
    # mise a jour client

    client_id = int(cid)

    if client_id != 0:

        self.write(cr, uid, client_id, {
             'name': name,
             'firstname': firstname,
             'zip': czip,
             'phone': cphone,
             'mobile': cmobile,
             'email': cemail,
             'pos_comment': ccomment,
             }, context=context)
        idClient = client_id

    # creation client
    else:

        idClient = self.create(cr, uid, {
             'name':name,
             'firstname':firstname,
             'zip':czip,
             'phone':cphone,
             'mobile':cmobile,
             'email':cemail,
             'pos_comment': ccomment,
             'company_id':False,
        }, context=context)

    return idClient
This function is used to create or modify a customer. Basically, when you send a customer ID is an update, if there is no ID or the ID is 0, it is a creation.
VII-C-2. About « Comment » field▲
The « comment » field (comment) is a special field. The text you enter here will be displayed on the receipt.
Here is one possible application:
For example, in Portugal, a receipt must have a tax number of the customer. It is this field that will serve to inform this issue.
VII-D. The purchase history for the selected customer▲

When a customer is selected and it has already made purchases in your store, you can see the history of their shopping by clicking on the icon above.

The left panel is grayed again and the customer sales appear in the main panel.
Click on an order to see the detail.
VII-D-1. To retrieve orders from a customer▲
Here we call a Python function from the JavaScript file of Point Of Sale with the call() function:
show_histo: function(){
    var self = this;

    // remove sales lines
    $('#sales-list tr').remove();

    var cid = $('#input_partner_id').val();
    if(cid && cid != 0){

        var Mread = new instance.web.Model('pos.order');

        Mread.call('get_partner_orders', [cid], undefined, { shadow:true })
       .fail(function(orders){
            alert('Partner orders : get_partner_orders = failed');
        })
        .done(function(orders){

            if(orders.length > 0){
                // la suite du code
            }
        }) ;
     }
},
In the code above, we call get_partner_orders() function is in the file tg_pos_enhanced.py by sending the customer ID.
    def get_partner_orders(self, cr, uid, partner_id, context=None):
        if context is None:
            context = {}

        result = []
        o_ids = self.search(cr, SUPERUSER_ID, [('partner_id', '=', int(partner_id))])

        if o_ids:

            for o_id in o_ids:
                order = self.browse(cr, SUPERUSER_ID, o_id)

                res_o = {
                    'id': o_id,
                    'pos_reference': order.pos_reference,
                    'date_order': order.date_order,
                    'name': order.name,
                    'state': order.state,
                    'cashier_name': order.cashier_name,
                    'discount': order.discount,
                    'amount_total': order.amount_total
                }

                result.append(res_o)
        return result
The function browses the pos.order table and returns the customer's orders if any.
Attention in the case of use OpenERP multi-company, a user can not retrieve orders made by another user, which is why we use here the constant SUPERUSER_ID that allows you to perform actions on ORM as administrator (use with caution).
To this must be added at the beginning of Python file:
from openerp import SUPERUSER_ID
VII-E. SellCustom Packs▲
As we have seen before, it is now possible to sell Custom Packs.
When selecting a Custom Pack in available products, the form below appears:

This is where you can select the products and variants according to the desires of the customer.
When you click on the button « Add Pack to order », the pack appears in the cart as below:

As you see in the picture above, the name of the package and its components have been modified. They display ■ character for the pack and ├ for the elements (1).
In addition, as you see, only the pack displays its prices, items are pack them to 0.00 euros (2). This will help to display all the products on the receipt and will also remove the products from stock, except the package itself I remind you is a service which generates no stock movement.
On the payment page, nothing changed:

In the other hand, on the receipt, the Custom Pack appears as in the cart:

VII-E-1. How does it work?▲
Yes, this is probably the question you're asking.
It is not easy but I'll try to explain how it works.
First, the tg_pos_packs module adds a field to the table product.product. The field 'is_pack':
_columns = {
    'is_pack': fields.boolean('Custom Pack'),
    'pack_ids': fields.one2many('product.pack', 'product_id', 'Items in the pack'),
    }
When a product is a Custom Pack, the field 'is_pack is then set to' True '.
Then, in the tg_pos.js file, it will detect if a product is a Custom Pack or not. For this, I had to modify the original function of the point of sale addProduct() :
        addProduct: function(product, options){

            options = options || {};
            var attr = product.toJSON();

            // if is_pack = false, this is a real product
            // we send it to the order
            if(attr.is_pack == false){
                attr.pos = this.pos;
                attr.order = this;
                var line = new module.Orderline({}, {pos: this.pos, order: this, product: product});

                if(options.quantity !== undefined){
                    line.set_quantity(options.quantity);
                }
                if(options.price !== undefined){
                    line.set_unit_price(options.price);
                }

                var last_orderline = this.getLastOrderline();
                if( last_orderline && last_orderline.can_be_merged_with(line) && options.merge !== false){
                    last_orderline.merge(line);
                }else{
                    this.get('orderLines').add(line);
                }
                this.selectLine(this.getLastOrderline());
            }else{

                // this is a Pack !!
                this.show_screen_pack(attr.name);

                // get templates
                this.get_templates(attr.id);

            }
        },
It retrieves the attribute 'attr.is_pack' of the product. If it is 'false', it is a common product and it is normally added to the order.
If it is a Custom Pack, then displays the form of Custom Packs and elements/variants of products are retrieved.
When then validates the form of Custom Pack to send the order, we will rename the products for they appear in the cart as a Custom Pack and we will put the price of products to 0.00 euros.
        add_products_from_pack: function(){
            var self = this;
            var nb_items = $('#input_nb_items').val();
            var selectedOrder = this.pos.get('selectedOrder');

            var pack_id = $('#pack_product_id').val()
            var pack_product = null;

            pack_product = self.pos.db.get_product_by_id(parseInt(pack_id));

            // add pack product to the order
            if(pack_product){
                var is_pack_previous = pack_product.is_pack;
                var pack_name = pack_product.name;

                pack_product.is_pack = false;
                pack_product.name = '■ ' + pack_product.name;

                var m_pack_product = new module.Product(pack_product);
                selectedOrder.addProduct(m_pack_product);

                var cur_oline = selectedOrder.getSelectedLine();
                cur_oline.product.set('is_pack', is_pack_previous);

                pack_product.is_pack = is_pack_previous;
                pack_product.name = pack_name;
            }

            for(var i = 1; i <= nb_items; i++){
                var field = $('#v_' + i);
                var product_id = parseInt(field.val());
                var product = self.pos.db.get_product_by_id(product_id);

                //add products to the order
                if(product){
                    // change name (suffix)  + price = 0.00
                    var previous_name = product.name;
                    var previous_price = product.price;

                    product.name = '├ ' + product.name;
                    product.price = '0.00';

                    var m_product = new module.Product(product);
                    selectedOrder.addProduct(m_product);

                    // change name + price back
                    product.name = previous_name;
                    product.price = previous_price;
                }
            };

            self.hide_screen_pack();
        },
For the Pack itself and its components, the product are retrieved from the temporary database loaded on boot of POS (LocalStorage) , change the name and the price for the items, and then sends them to the order as standard products by recalling the original function:
var m_pack_product = new module.Product(pack_product);
selectedOrder.addProduct(m_pack_product);
Then we rename again the products as they were originally.
It's a little twisted, but it is currently the best way I've found.
VII-E-2. Special Features of Custom Pack▲
You can not select the items of a Custom Pack in the cart. And you can not change the quantity of a Custom Pack. The reason is simple: it is to display Custom Packs separately in the cart and on the receipt.
So you can not delete an item of a Custom pack, however you can delete an entire Custom Pack. In this case, the elements of the Custom Pack are also deleted.
That is why I also changed the function of selecting items in the cart.
        selectLine: function(line){
            if(line){
                var product_name = line.product.attributes.name;
                var is_pack = line.product.attributes.is_pack;

                if(product_name[1] != '├'){
                   // this.selected_orderline.set_selected(undefined);

                    if(line !== this.selected_orderline){
                        if(this.selected_orderline){
                            this.selected_orderline.set_selected(false);
                        }
                        this.selected_orderline = line;
                        this.selected_orderline.set_selected(true);
                    }

                    if(is_pack == false){
                        $('#numpad-return').removeAttr('disabled');
                        $('#return_img').attr('src', 'tg_pos_enhanced/static/src/img/return_product.png');
                    } else{
                        $('#numpad-return').attr('disabled', 'disabled');
                        $('#return_img').attr('src', 'tg_pos_enhanced/static/src/img/disabled_return_product.png');
                    }

                }else{
                    $('#numpad-return').attr('disabled', 'disabled');
                    $('#return_img').attr('src', 'tg_pos_enhanced/static/src/img/disabled_return_product.png');
                }
            }else{
                this.selected_orderline = undefined;
                $('#numpad-return').attr('disabled', 'disabled');
                $('#return_img').attr('src', 'tg_pos_enhanced/static/src/img/disabled_return_product.png');
            }

        },
In the above function, all products whose name starts with '├' (items of the pack) are no longer selectable.
Also, and we'll see later, if a product is a Custom Pack, it can not be returned. We can only return products unit.
VII-E-3. Delete a Custom Pack▲
When you delete a product, it actually changes the quantity to reduce it to zero.
In fact, when a product should be removed from the cart, the quantity becomes 'remove'.
When you want to delete a Custom Pack, you must also delete the items it contains.
To do this, I also had to modify the original point of sale set_quantity() function:
if(quantity === 'remove'){

                // when we remove a pack
                // we have too remove items too !
                if(product_name[0] == '■'){

                    var o_lines = [];
                    var cur_order = this.pos.get('selectedOrder');
                    var sel_line = cur_order.selected_orderline;

                    (cur_order.get('orderLines')).each(_.bind( function(item) {
                        return o_lines.push(item);
                    }, this));

                    var flag_cur = false;

                    for(var i = 0,  len = o_lines.length; i < len; i++){

                        // when we found current line
                        if(o_lines[i] == sel_line){
                            flag_cur = true;
                        }

                        // we delete items of the pack
                        if(flag_cur == true){
                            var cur_product_name = o_lines[i].product.attributes.name;

                            if(cur_product_name[1] == '├'){
                                this.order.removeOrderline(o_lines[i]);
                            }else{
                                // until we found that this is not an item of the selected pack
                                if(cur_product_name[0] != '■'){
                                    flag_cur = false;
                                }
                            }
                        }
                    }

                    // then we delete the pack
                    this.order.removeOrderline(this);

                }
So here it is the same principle, it will detect if a product is a Custom Pack by retrieving the first character of its name.
If the first character is ■ , so we will first remove all product lines below that begin with the character ├ . These are the elements of the pack..
Then finally, remove the pack itself.
VII-F. Return a product▲
The return of a product is an interesting point of the module.
Imagine you sell a customer a Custom Pack contains 2 pairs of drumsticks Vic Firth 5A (5A is the size).
The customer comes back a week later and tells you that the 5A are really too heavy for him and he wants you to exchange him a pair of 5A against a pair of 7A thinner and lighter.
No problem, the customer is king.
You will return the pair of 5A drumsticks and exchange it against a pair of 7A.

I just changed the keypad. I removed the buttons that we were not helpful and I added a button « Product Return ».
You can completely recover the original buttons and place the button « Product Return » where you want. You just need to edit the template file NumpadWidget in tg_pos.xml
To return a product, simply add it to your cart, then click the button « Product Return ».
Below I returned a pair of 5A drumsticks and I added a pair of 7A drumsticks to the cart. So it is an exchange of product.

As seen in the image above, the pair of returned drumsticks has a negative price.

On the payment page, returned product + sold product = 0.

On the receipt, the two products appear as in the cart.
Reminder:
You can not return a Custom Pack.
VII-F-1. About stock▲
We have returned a product and then sold another product.
If we go to the « Warehouse » application (Warehouse) and that we display the movements of stock, we can see the two lines concerning our products we traded.

In the image above, we see that the pair of 5A drumsticks came from the outside to the stock and 7A went from the stock to the customer.
To achieve this sleight of hand, it will be enough to change the function of the point of sale create_picking() and ensure that when a price is negative to reverse the stock locations.
# line price < 0 = c'est un retour produit
# on retourne le produit de sortie -> Stock
if line.price_subtotal < 0:
    location_id, output_id = output_id, location_id
Here, the input and the output are inverted if the price is negative.
VII-G. Special disount▲
In our stores, we have restricted the functions of discounts so that sellers do not apply discounts, or several discounts to a customer.
For this, I added a function that allows the store manager to apply a special discount. Some of the stores are owned by the company, the rest are franchises, we wanted the manager specifies why he applied a discount to such customer.
Special discount is applied after entering the password provided for this purpose.
For this, an additional field was added to the table res.users

The password is not encrypted, but it is only visible to the administrator (Technical settings)
VII-G-1. Apply a special discount▲
When you want to apply a special discount to a customer, you should call the store manager.

The manager must then click on the icon for this purpose. The screen turns black and a form appears to allow the manager to set a discount.
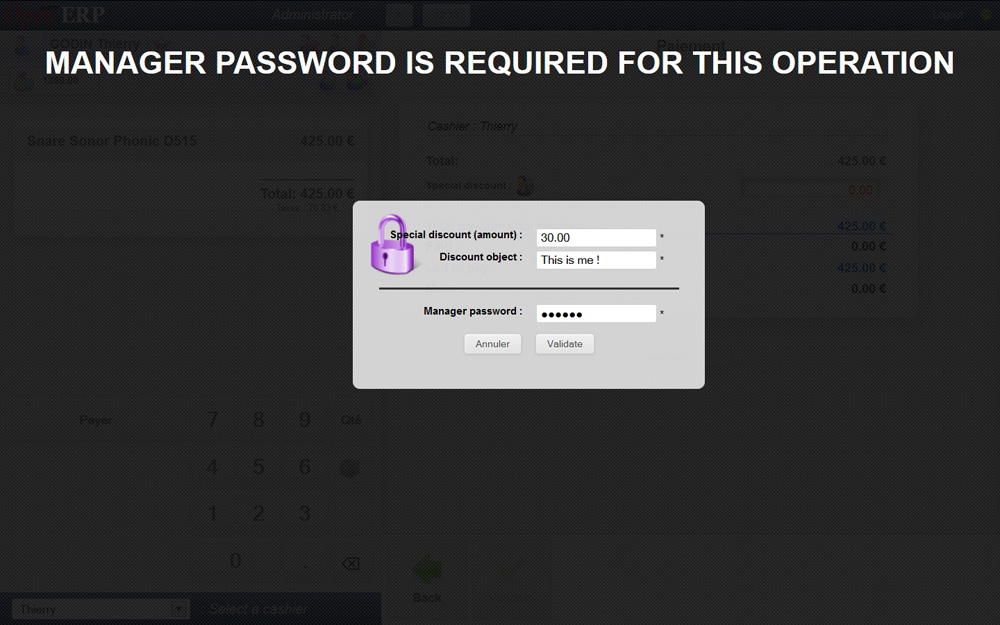
Enter the amount of the rebate (value, not a percentage), then the password.
Then click « Validate »

As seen in the image above, a discount of 30.00 euros was applied to the order that has been recalculated.

On receipt the discount is very clear.
VIII. Modules installation▲
First, make a backup of your database.
Unzip the ZIP file into a directory and copy the files of each module in your modules directory.
Create a modules directory out of OpenERP tree, this will help you find your way more easily.
Voir : Comment ajouter un chemin vers les modulesComment ajouter un chemin vers les modules
Be sure to install the following packages in the order below. You can restart the server after installing a module to check the operation.
- Installez bien sûr le module « Point Of Sale » (Point de Vente) original ;
I myself made a OpenERP installation dating from 12.06.2013
(version 7.0-20131206-002433) and I did not use the demo data. I have no problems running.
- Install module product_vatiant_multi ;
- Install module tg_partner_firstname ;
- Install module tg_pos_packs ;
- Install module tg_pos_message ;
- Installez finally module tg_pos_enhanced ;
- Then create some products, some customers;
- Create a Custom Pack using the above products;
- Create at least one cashier to the point of sale (POS Menu / Cashiers);
- Create a password for special discounts (Settings Menu /Users → Point of sale Tab );
- Create a welcome message to the POS (Point Of Sale Menu / Tools / Messages);
Do not forget to restart the server, then open a new session in the Point Of Sale and use the new features.
Once you have toured the new, then you can install these packages on your production environment.
IX. Download▲
Download : openerp_tg_pos_enhanced_package_1.0.zipTélécharger (197 Ko)
X. Remerciements▲
Thanks : OpenERP SA for OpenERPOpenERP software.